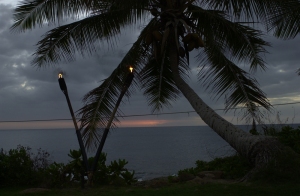
For this week’s After Before Friday Forum, I went with a picture from Hawaii that I took in 2002. I was going through my Hawaii pictures for the Photo Friday Challenge on Paradise and I wound up having to do a lot of editing. (I was just learning my camera back then and apparently had a very dirty lens.) So, I saved this picture for the forum. If you want to check out the other paradise shots, just click here.
Now, let’s get down to editing business. My original shot was taken with some Nikon camera but I don’t recall which one as the camera info on the picture tells me nothing, which makes me wonder if my file is just not some copy of the original. Who knows what I did back then… Anyway, here is my original shot with no edits, other than resizing for the web.
After opening the original picture, I took the following steps in Photoshop CS5:
- Increased the saturation by 30.
- Erased out the rope that was going across the picture.
The erasing of the rope took a long time and was very tedious. It is done with the clone stamp tool. Basically, you pick an area of the picture that you want to clone and stamp it over the part you want to erase. In my experience you can’t use the stamp at 100 percent though. If you do, it just looks to fake and obvious. So, you have to clone spots of the photo over each other at lower percents and then blend them with other areas. So you blend the different blues of the sky over where the rope is. This way, you don’t get some weird blue streak across your picture.
The rope goes across the tree and the palm leaves too though. This required me to zoom into the photo and clone parts of the trees and tiki poles too. It requires a lot patience and practice, but when you are done, it is worth it.
After getting a cramp in my hand from cloning, I opened the HDR effect on the photo and adjusted the items in that effect to the following:
- Radius +30
- Strength 1.05
- Gamma 1
- Exposure + .39
- Detail – 63
- Shade – 90
- Highlights +48
- Vibrance +62
- Saturation +23
- Raised the curve bar to brighten
After all of that, I felt pretty happy with the picture and got this end result.
What do you think? Would you have done anything different? I welcome your critiques as I think it is a great way to get new ideas. So feel free to give me some suggestions. Heck, feel free to even tweak the before photo if you want too.
If you are not a regular to the AB Friday Forum, make sure you check out the host blog, Visual Venturing. Stacy posts all the contributing blog links there.
UPDATE:
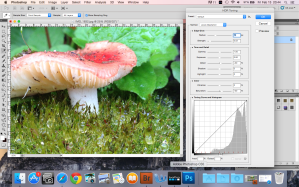
Here is the HDR Toning screen that I mentioned in the comments below:


You did such a great yob, the After looks very beautiful. Your comment about hand cramps made me laugh, I can relate to that.
LikeLiked by 1 person
Thank you:) and its to true! All this editing lately is mako in my hand hurt! Sad and funny, and true-lol.
LikeLiked by 1 person
I really like what you’ve done here Michelle.
LikeLiked by 1 person
Thank you! It is great to get feedback.
LikeLike
Thank you kcinaz:)
LikeLike
Great image Michelle! Great edit too! Cloning does take a heck of a lot of time, I wonder if you have tried the content-aware fill in PS? You might have had to clone in the close up areas around the leaves, but it might have saved you tons of time on the sky parts. In case you don’t know… Select an area that you want removed, then go to Edit->Fill (choose content-aware from the drop-down menu), or Shift-F5. Sometimes you have to reselect parts of an area or choose a closer select… when it works out – it is great. Sometimes it doesn’t work well if there are things in the area next to where you want to remove that you don’t want replicated. You just have to fiddle with it, much like the patience you had with the clone stamp. Just an idea, in case you weren’t aware of that feature. 😀
I very much like this HDR effect you speak of, I don’t know how to do that, could you explain a bit more where that option is? I’ve played around with three photos (over-, normal-, under- exposure) and then had it create a HDR image with various presets… but it’s been awhile and I don’t really remember how it all works, especially for a one-image process.
LikeLiked by 1 person
What!?! I will check that out when I get to my computer!
LikeLiked by 1 person
They improved the content-aware a bit more in CS6 but it was still nice in CS5 😀
LikeLiked by 1 person
I’m so looking for it in CS5.
LikeLike
Let me get to my computer so I can type a decent explanation on HDR by making sure I am leading you right. (On my phone now.)
LikeLike
OK looking forward to your next reply 😀
LikeLiked by 1 person
Oooh, me too, I want to know! 😀 Wonderful editing on this image, Michelle. Thank goodness for all the post-processing software that can rescue us from our mistakes and past lack of knowledge! I had the opportunity to visit Hawaii in 2005 and took tons of jpegs. I’ve had some luck working with them, just like you did here. Keep working on ’em. Hawaii offers such spectacular scenes!
LikeLiked by 1 person
Thanks Stacy! I so miss it there. It was such a short time frame due to a deployment and then a separation. I sure would love to go back and take more pictures…and sit on the beach. You will have to put out some links to your Hawaii pictures. I would love to see them!
LikeLiked by 1 person
OK- Finally at my computer. The HDR effect is under the image tab (in CS5 that is), then under adjustments. The actually wording is HDR Toning. When you open it, a new tool box opens that has a toning curve and histogram (which I will add a picture of in the post in a few minutes) and some slide bar options on: radius, strength, gamma, exposure, detail, shadow, highlight, vibrance and saturation. I am still learning this option, but I seem to like the option of reducing the details while raising the strength. It seems to add a soft dreamy state to the photo. It doesn’t work for all photos though. And often, when the HDR Toning is opened on photos, the exposure and saturation are high, so I almost always have to push them back down. Does that help?
LikeLiked by 1 person
Thanks! That does help I’ll have to go look into it. Definitely something to go play around with. 😀
LikeLiked by 1 person
I am sure you can probably do same or similar things in camera raw, but this is just one way I know.
LikeLike
Great job removing the rope – I work in jpeg and understand too well how tedious it can be. Great image in the end.
LikeLiked by 1 person
Thank you Lynne!
LikeLike
A lot of hard work and a great image at the end.
Not to make your hard work seem for nothing, but if you opened in camera raw you can use the clone/heal tool and drag it across and it samples quite well, what used to give me hand cramp I remove in about a quarter of the time.
LikeLiked by 2 people
I’ll have to remember that for my raw images! This one was some old JPEG. I so need to learn more camera raw to save time!
LikeLike
If you want you can still open Jpegs in camera raw you just have less leeway with the basic adjustment sliders and curves.
LikeLiked by 1 person
Thanks Ben. I will check that out.
LikeLike
It’s beautiful. I would say it was worth all the work.
LikeLiked by 1 person
Thank you:)
LikeLike